Showing posts with label #salesforcedevs. Show all posts

Tuesday, 12 September 2017

Using FLOW from an Object-Specific Action (Beta) - Salesforce Winter'18 ☃️


We can add FLOWS to the action menu on your Lightning pages     
without hunting down the Flow’s URL. When we create a flow 
action, we can pick from a list of available flows rather than
enter the flow URL manually.  As of now its in beta, so soon we will have more updates on this feature.

Flow actions can’t be global actions, and they can’t be deployed 
to other orgs, such as with packaging.

This feature is available in the Lightning Experience and all versions 
of Salesforce1 mobile app.

For this, the FLOW which you are using in the Flow Actions, 
must be active and have Screens.


Steps for Creating Flow Action and adding it into the Object:


I have just created a FLOWS on Opportunity object to show how the FLOWS worked when we add this into the Actions.

Below is my activated FLOW on the Opportunity object where I am creating a new record.


After that, we will create a Flow Action. For this go to Setup -> Object (Standard/Custom on which you have created your FLOW) -> Buttons,Links, and Actions ->  New Actions 


Here is my new FLOW Action on opportunity object:


You can add flow actions to an object’s page layout using the page layout editor. To see your org’s flow actions in the page layout editor, check out the Salesforce1 & Lightning Actions category in the palette.


You can see, my "Quick Create" Flow action is added into my Opportunity object.


Here’s how that action appears in the Salesforce1 action bar for Opportunities.


Here is the demo of how records are creating in Opportunities object using this "Quick Create" Flow action.


Related Information


1. Trailhead Project: Create a Satisfaction Survey 
2. Trailhead Module: Build a Discount Calculator
3. Salesforce Winter'18 Release Notes


Stay tuned 📣 for more Winter'18 features.

Thank you!!!

Sunday, 10 April 2016

GET READY FOR CHANGES TO APEX TESTING - Spring'16 Release


The Salesforce Spring'16 released with a long list of changes. As a developer, the changes that most excite me are generally those that are covered in the Development and Deployment categories of the Salesforce release notes.


Test Suites for Apex Test Classes


Salesforce has now added the option Suite to group unit test classes into test suites.you have test classes which you run every time while you preparing for deployment. Now, with this new feature, you can create test suite which contains those set of classes. Also, you can create or modify test suites that contain up to 200 test classes using the Developer console.

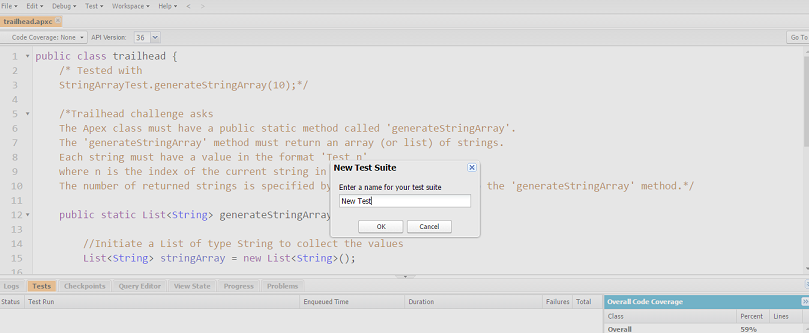
To create a Test Suite using Developer console : Select Test | New Suite.


Enter a name for your Test Suite.


To choose which classes are in a test suite, select Test | Suite Manager | Your Test Suite | Edit Suite.


Once you select your test classes(it will we more than one also), click on save button. After this to run your test class which you have selected, click on Test | New Suite Run.


Select the Test Suite you want to run and then click on your right corner button "Run Suite".


After clicking on Run Suite, you can see you result here:


Now you have created the test suite and executed your test classes. Isn't that easy..!!


Set and Modify CreatedDate field of the Tests Records


There is a new method has been introduced System.Test.setCreatedDate. You can change your records created date in the test class. This method we can utilize to test the scenarios where we are using created dates of a record.

Here is the example of how to use this method.


1:  Account a = new Account(name='myAccount');  
2:  insert a;  
3:  Test.setCreatedDate(a.Id, DateTime.newInstance(2012,12,12));  


Wednesday, 13 January 2016

VisualForce Basics


  • It is a mark-up language same as html.
  • It will be easier for the salesforce developers once they know how to combine the VisualForce  page with Apex.
  • It is much easier to learn compare to Apex.


MVC Pattern in Visualforce Page

The Model is simply the underlying database. In Visualforce, it’s the collection of Salesforce objects and fields that we had represent and modify in our page.

The View is the code that makes up our page’s UI. Here, it’s all of our Visualforce, HTML, CSS, and JavaScript code.

The Controller is the middle layer between the model and the view. It’s the Apex code that interacts with the database according to the view’s needs.


Where to write Visualforce Code?

For writing your first code in Visualforce Page, you need to start from here:

Step 1: Turn Development mode on in your user detail page.
             Your Name >> My Settings >> Personal >> Advanced User Details


Check both boxes and save it. This enables a VisualForce editor whenever you view your VisualForce page.

Step 2: Create a new VisualForce page
             Setup >> Develop >> Pages >> New 


Step 3: Click the New button and started writing your VisualForce code.


Step 4: Click the Preview button to open up the Visualforce editor.


Visualforce Tags

Here are the VisualForce tags that are used commonly in our visualforce development. We will discuss all the visualforce tags in my next blog.

<apex:page>
<apex:form>
<apex:pageblock>
<apex:pageBlockSection>

<apex:commandButton>

<apex:pageBlockButtons>

<apex:commandLink>

<apex:outputLink>

<apex:inputField>

<apex:inputFile>

<apex:inputHidden>

<apex:inputsecret>

<apex:inputText>

<apex:inputTextarea>

<apex:inputCheckbox>

<apex:outputField>

<apex:outputLabel>

<apex:outputText>

<apex:pageBlockSectionItem>

<apex:pageBlockTable>

<apex:column>

<apex:dataTable>

<apex:tabPanel>

<apex:tab>

<apex:toolbar>

<apex:toolbarGroup>

<apex:pageMessage>

<apex:panelBar>

<apex:panelBarItem>

<apex:panelGrid>

<apex:panelGroup>

<apex:param>

<apex:repeat>

<apex:facet>

<apex:actionFunction>

<apex:detail>

<apex:actionPoller>

<apex:actionRegion>

<apex:variable>

<apex:stylesheet>

<apex:SectionHeader >

<apex:relatedList>

<apex:listViews>

<apex:enhancedList>

<apex:actionStatus>

<apex:actionSupport>


Hope this helps you.  Happy Coding :)